
When I make homemade bread, I like to make quite a few loaves at once. I don’t have time to make bread more than once a week (and I don’t even make it that often) so I like to have a lot to show for the effort.
This recipe will make 4 loaves. But it’s too much dough for my stand mixer to handle so I make it by hand. I enjoy the process of starting with flour and yeast, then kneading the dough to form loaves. It feels rustic and wholesome and slow. Such a contrast to the rest of modern life.
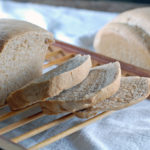
Of course, nothing compares to pulling hot loaves from the oven and slathering butter over thick slices.
Homemade bread is easy to make, but it does take some time and a little bit of muscle too, if you’re doing it by hand. I’m going to take you through the whole process, so there are a lot more photos in this post than most of my posts.
Tomorrow, I’ll share how to make Whole Wheat Cinnamon Rolls with part of the dough.
Here are the ingredients you’ll need:

Technically, this isn’t whole wheat bread. I use a combination of whole wheat flour and white flour (preferably bread flour, but you can also use all purpose). Whole wheat flour by itself will bake up a very heavy loaf. You can add gluten to the mix to help the dough to rise, but I prefer to use white (bread) flour along with the wheat. I use about 6 cups of each.
You’ll also need yeast. I buy the jars of bread machine yeast. I use honey to add to the flavor and help the yeast rise. Butter helps the bread to keep a bit longer. You don’t have to use it, but it’s a nice addition. And of course, you’ll need salt and warm water, neither of which made it into the photo.
Step 1
In a very large bowl, dissolve 4 Tbs. yeast in 5 cups warm water. The water should be about the temp of a baby’s bath water or about 85 degrees. Add a teaspoon of honey to the yeast and water. Stir with a wooden spoon.

Step 2
When the yeast is dissolved, add the another 4 Tbs. honey, 4 tsp. salt, 8 Tbs. butter and 6 cups whole wheat flour.

Stir this vigorously for several minutes. You want it well mixed and you also want to give it a good workout. This makes combining the rest of the flour easier.
It should like like this after you stir it:

It should be very thick liquid that’s kind of stretchy. Sounds good, doesn’t it?
Step 3
Now it’s time to add 6 cups of white flour.

Stir vigorously with a wooden spoon. This is going to be harder to mix, because you’ve added more flour. Work the flour in as much as you can with the spoon. When you can’t stir it very well and most of the flour is worked in, turn it out on a floured table or counter to knead it.
Step 4 – Kneading
Kneading is going to take a total of 10-15 minutes. Fold the dough over, smoosh it, give it a quarter turn and repeat. Continue to work flour in as needed. Keep your work surface floured too. As the dough becomes more elastic and smooth, you may only need flour on your hands and/or counter, just to keep it from sticking.
Here are some photos of the various stages of kneading:

1. This is right after I turned the dough out of the bowl. You can see that’s it’s a very rough ball.
2. After several minutes of kneading, it begins to form a better ball. It’s still rough at this stage and not very elastic.
3. The dough is getting smoother and more elastic, but it’s not quite there yet.
4. Finally, the dough forms a smooth ball. The dough is elastic and you only need enough flour to keep it from sticking to the counter.
Step 5 – Rising
Clean out the bowl you used to mix the dough. Spray it with cooking oil and place the ball of dough in the bowl. Flip the ball over so the oiled side is on top. Cover it with a clean cloth or towel. Set the bowl in a warm place – the top of the refrigerator, on the counter under a light, on top of the stove if the oven is on. If it’s a warm day, just sitting on the counter may be enough.
After about 1-2 hours, the dough will be doubled in size.

Punch the dough down. At this point you can choose to put it in pans or let it rise again. I usually put it in pans, but if I’m busy, I’ll let it rise a second time. It’s up to you.
Step 6 – Divide and bake
Use a sharp knife to cut the dough in half, then in half again. Grease 4 bread pans and shape the loaves. Place them in the pans. Cover and let rise about 30 minutes or until they’re doubled in size.

This much dough will make enough for 4 loaves of bread. I made 3 loaves and 2 pans of cinnamon rolls (how-to coming tomorrow).
Bake the loaves at 350 degrees for 30-35 minutes. They should sound hollow when done. You can also test the loaves with a cake tester. If it comes out clean, they’re done.

Cool the loaves completely for best slicing. But I recommend you only give them a few minutes out of the oven before slicing into a loaf. Slather with butter and enjoy!
You can freeze the loaves too. Just wrap tightly or put in a gallon size Ziploc freezer bag.
How to Make Whole Wheat Bread by Hand
Ingredients
- 4 Tbs. yeast
- 5 cups warm water
- 4 Tbs. + 1 tsp. honey
- 4 tsp. salt
- 8 Tbs. 1 stick butter, melted
- 6 cups whole wheat flour
- 6 cups bread flour
Instructions
- In a very large bowl, dissolve the yeast in warm water with a teaspoon of honey. Stir with a wooden spoon.
- Add remaining honey, salt, butter and whole wheat flour.
- Stir vigorously with wooden spoon for several minutes.
- Add bread flour.
- Stir vigorously to combine the bread flour with other ingredients. When the dough forms a ball and you can't stir it any more, turn out onto a floured work surface.
- Knead the dough for 10-15 minutes.
- Clean the large bowl and oil it. Put the dough in the bowl and cover with a clean cloth. Let rise 1-2 hours or till doubled in size.
- Punch down the dough. Divide into 4 parts.
- Grease 4 loaf pans. Place dough in pans. Cover with cloth and let rise about 30 minutes till double in size.
- Bake at 350 degrees for 30-35 minutes. Loaves should sound hollow when tapped or cake tester should come out clean.
- Remove from pans and cool.


This is definitely something I want to give a go but most recipes seem so tricky and labor intensive. This looks like something I might be able to try! 🙂
What a great post Tiffany! You make bread making look so easy! I’m a little yeast challenged myself!
Thanks for sharing the steps!
~Liz
Tiffany, thanks for sharing this recipe. I would love to make this. Would it be possible to make less bread, say 1 to 2 loaves? Would you just adjust the recipe in half?
Roxie, you can cut the recipe in half for 2 loaves. It will work fine.
Great, thanks for the quick reply.
I made this the day you posted it and it was delicious! I halved the recipe (just in case I messed it) and it turned out perfectly. I should have made the whole recipe because both loaves are now gone – the kids loved it!
I have two loaves of this bread in the oven as I am typing. It smells wonderful! I wish I’d had more yeast on hand and would have made the entire four loaves. Oh well, will be making again. This was easy!
Oh, yum! You just can’t go wrong with homemade bread. Your loaves look amazing!
Hi –
I just made this and had the salt out but got distracted and forgot to put in in. It’s now in the first rise. What can I do about the salt?
Lady Lep
Oh no! Unfortunately, there’s not much you can do about adding the salt now, I don’t think. You’ll still be able to eat the bread, but it may taste flat. Use salted butter on it or peanut butter or other things to add flavor. I’ve done that before myself!
It was dreadful! For me and my husband wasn’t thrilled with it. But my 8 and 5 yo didn’t say anything. I buttered it and salted it. It will still be good for french toast, grilled cheese and bread crumbs, I hope!!
Lady Lep
Or you could make croutons with it.
This bread is rising on my stove as I type this. I have been making dough in my bread machine for about 1.5 years now but this is my first attempt at making in completely by hand. Excited to see how it turns out.
Let me know how you like it. It’s a great feeling to make bread, isn’t it?!
It is delicious. I am making it again right now but I used traditional yeast last time and I think I’m going to try bread machine yeast this time and see how it turns out. I just assumed I couldn’t use bread machine yeast until I saw what you used. I’ll let you know how this batch turns out. 🙂
I was just wondering about not using the (white) bread flour and just using all of the wheat flour. What would be the difference? Would I have to add sugar or extra honey? Is there anything extra or different I would need to do?
This looks like a fun thing to try so I’m excited, but I’d prefer to use all wheat; if it’s going to be too difficult or anything I can just go by your recipe, I was just wondering.
The only thing about using all whole wheat is that it can make a very heavy loaf that may not rise well. You can add gluten, but I’ve never tried that. It’s a good way to get a nice, whole wheat loaf though.
Please add Pinterest to your website! 🙂
Nevermind 🙂 Found it on the upper right hand side. Love your website.
Kristen, I’m glad you found it. There’s also a “pin it” button on the left above the photo at the top of each post. I love when people share through Pinterest!
hi.. thanks for the great recipe, I have just a doubt, the yeast to be used is active or dry.. sorry if my question is funny…im just starting my baking experiences..all the best
I meant active or instant..see..i m a junior… =)
Eve, either kind of yeast will work. I usually buy the jars of bread machine yeast, but I’ve used other types too.
Thanks a lot for the kind reply.. I took my chances and used active yeast, I had lot of fun and sweat kneading hahahaha.. bread came out fantastic, cinnamon rolls a bit crunchy but ok, the glaze didn’t work out fine but still we enjoyed them.. I used some dough for mini pizza snack but I guess I left them too long inside the oven and ended up a bit like a cracker. My Preschooler daughter had fun showing off her mini cinnamon rolls with brown sugar as a morning snack.as well as my husband at his office. Thanks again and be sure I will be following your recipes. have a great day =)
I’m using two large bread pans for larger loaves of bread how much longer do I need to bake the loaves for?
Tracy
Tracy, using just two bread pans is going to make very large loaves of bread. I bake for 30 minutes, but you will probably need to increase that. I’m not sure by how much. One way to tell if bread is done is that it should sound hollow when you tap the loaf on the bottom. You may need to experiment with baking time to get it right for the size loaf you are making.
Thank you so much for your caring and quick response Tiffany.
Tracy
Hey Tiffany ,
What did you mean by bread machine yeast? Is this instant or non-instant yeast. I bought fermipan instant yeast in the 11g packets to try this recipee. Can I use this and how much would I have to use to make the same 4 loaves. I also don’t have honey. Can I use sugar as a substitute and how much can I use.
If i’m using instant yeast do I still have to follow step 1 by dissolving it in warm water or add directly to dough and adding cold water instead. I’m a beginner to baking bread hence the reason i’ve got so many questions.
Samantha, read on your package how many teaspoons there are in it and then use the equivalent. And I do think you can dissolve it in warm water too. You might be able to skip that step, but I don’t think it would hurt to do it.
You can use sugar as a substitute. Use the same amount of sugar as honey.
Hey Tiffany,
Thanks for the reply. I’m happy to report that the bread came out perfectly. I couldn’t believe that my first attempt was so perfect. It even taste better than store bought bread. We’re having it with barbecue chicken, grilled potatoes , coleslaw and chicken kebabs. Yummy can’t wait!!!
I have tried out this recipe and it is fantastic!!!,it’s fantastic.Thanks alot.
Wow! Thanks. Can’t wait to try this.
Is this ok for health watchers?like increasing wheat n reducing white?
Mimi, you can reduce the amount of white flour and increase the wheat. It makes a heavier loaf of bread though.
Wow!this is the first time I’m getting such a speedy response from a public site!im totally pleased. Well done. Do you have other recipes for health watchers?Also,is canola oil is good to use?thanks
Mimi, I’m not an expert on health, but I do have some healthy recipes. It depends on what kinds of things you’re trying to watch or eliminate from your diet. There are so many different types of eating plans, that even the definition of healthy can get a bit murky.
I love your step by step explanation its very interesting, i’ll give a try today thanks a lot. But can i make my bread with whole wheat flour only without adding white bread flour? Have a wonderful activities & moment
You can make it with only whole wheat flour, but it makes a heavy loaf of bread. The bread flour lightens it up.
Thanks a lot God bless u i will give you a feed back when i try……elijah
Hi Tiffany
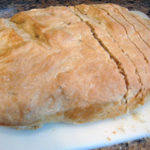
I foloowed this recipe with a slight tweak. I used Pillsbury bread mix (with gluten) and fine flour (1 cup bread mix and 2 cup flour). It didn’t sort of go well. Here are the pics. Can you please help me figure out what went wrong?
1. One side burst open
http://s15.postimg.org/a7rf14qzf/20140307_222030.jpg
http://s15.postimg.org/r9k9385uj/20140307_222037.jpg
http://s15.postimg.org/aoh81b44b/20140307_222049.jpg
2. Didn’t get the texture. Doesn’t taste well
http://s15.postimg.org/kx9p74s63/20140307_222613.jpg
I am a dude 🙂
Jas, I think you let it rise too long. I’ve had loaves that looked like that before. As far as the taste, when my bread tastes flat, it’s because I didn’t add quite enough salt. Bread baking is one of those things that takes practice, because the flour, yeast and water temp all work together in a bit different way each time. If the room is warmer or cooler or more humid, that will affect the loaves. Oh, also, from the last photo, I don’t think it was quite done baking. It looks a little doughy. Keep baking though. You’re doing great!
Thank you for the reply Tiffany.
I won’t stop. I’m from India, its just that some of the substitutes, like for flour are just a bit confusing as to which one to use. i have already used 4 types.
Could it be i’m using paper mould and the bread is heavy?
Could it be i’m using microwave oven instead? Should i increase baking time?
Any thoughts?
You’re baking this in the microwave? I’m impressed! I wouldn’t have thought you could get results this good by using a microwave for bread baking. I don’t really have any tips for doing that, but I think you’re on the right track. Ovens and microwaves are very different, so what works in one may not work in the other.
Okay. Its a LG microwave + Oven combo. I know they are not great. I can bake muffins, cakes donuts etc. Just not getting the hang of bread baking.
So paper molds are OK?
I think the paper molds are fine. I’m guessing it’s just a matter of tweaking the timing for your microwave/oven.
I don’t use bread flour at all, just 100% white wheat, and I get an amazing loaf, every time.
Hi, I’ve been wanting to do this for a while but I don’t know how to incorporate instant yeast to recipes like this. Unfortunately, it looks like the yeast manufacturing company in my country pulled out or stopped making active dry yeast (I’ve searched 4 supermarkets and found NO active dry yeast at all). So I only have instant dry yeast at hand.
Instant dry yeast should work fine.
Nice, i will give it a try